Apple is always exploring new ways to integrate its products. Whether it’s updating iCloud or introducing features like using your iPad as a second monitor for your Mac, there’s always something fresh to try.
One of the standout features is Universal Control. This handy feature allows you to control multiple devices with just one keyboard and mouse.
The beauty of Universal Control is its seamless operation. No need to download any additional apps; as long as you have the compatible devices, you’re all set.
Here’s a comprehensive guide to getting started with Universal Control.
What Is Apple’s Universal Control?
Apple introduced Universal Control with iPadOS 15 in 2021. This feature enables you to connect multiple Apple devices, such as your Mac and iPad, allowing you to control them using a single mouse and keyboard.
With Universal Control activated, you can seamlessly move your cursor from one device to another and have them interact in real-time. For example, you can copy text on your iPad and paste it on your Mac within seconds.
How Does Universal Control Work?
Universal Control is one of those Apple features that feels like magic. Once you meet the necessary requirements, simply place your Macs or iPads next to each other, and they will automatically connect.
With Universal Control, both devices essentially function as one large computer. In addition to copying and pasting text between devices, you can also drag and drop items from your iPad to your Mac, or vice versa.
For instance, you can transfer pictures from your iPad to your Mac notes or move files between devices by simply dragging them.
What Do You Need to Use Apple’s Universal Control?
No special apps are required to use Universal Control as it’s integrated into macOS and iPadOS. However, you’ll need the right hardware, meaning a modern Mac and iPad that support the feature.
Fortunately, the compatibility list is extensive. Most Macs and iPads released in the last five years should meet the requirements.
Here’s the list of Macs that support Universal Control:
- 2016 MacBook or newer.
- 2016 MacBook Pro or newer.
- 2018 MacBook Air or newer.
- 2018 Mac mini or newer.
- 2017 iMac or newer.
- iMac (Retina 5K, 27-inch, Late 2015).
- iMac Pro.
- 2019 Mac Pro or newer.
- Mac Studio.
For the iPad, you’ll need one of the following models:
- iPad Pro (All models).
- 6th generation iPad or newer.
- 3rd generation iPad Air or newer.
- 5th generation iPad mini or newer.
Additionally, your iPad must be running iPadOS 15.4 or later, while your Mac should have at least macOS 12.3 Monterey installed.
Both devices must have Wi-Fi and Bluetooth enabled and be signed in to the same Apple ID with two-factor authentication activated.
Enabling two-factor authentication is recommended even if you don’t plan to use Universal Control, as it enhances the security of your Apple account. You can check and enable it from any of your Apple devices, as it’s an account-wide setting.
- Open the Settings app on your iPhone or iPad, or System Settings on your Mac.
- Select your Apple ID at the top of the screen.
- Choose Sign-In & Security.
- Select the option to Turn on Two-Factor Authentication if it’s not already enabled.
Lastly, both Apple devices need to be within 10 meters (30 feet) of each other.
How to Set Up Universal Control
With everything in place, it’s time to activate Universal Control. You’ll need to follow these steps on both your Mac and iPad.
How to Set Up Universal Control on Your Mac
- Click the Apple menu in the top left corner of your screen.
- Go to System Settings (or System Preferences for older macOS versions).
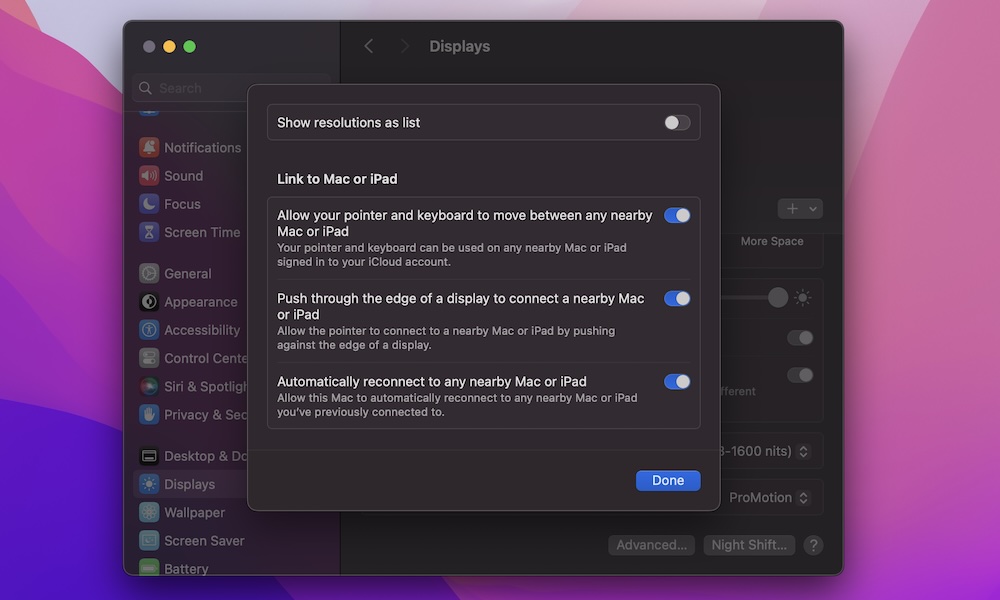
- Scroll down on the left sidebar and select Displays.
- If you’re using macOS Ventura or later, click on the Advanced button at the bottom of the settings window.
- Turn on Allow your pointer and keyboard to move between any nearby Mac or iPad.
How to Set Up Universal Control on Your iPad
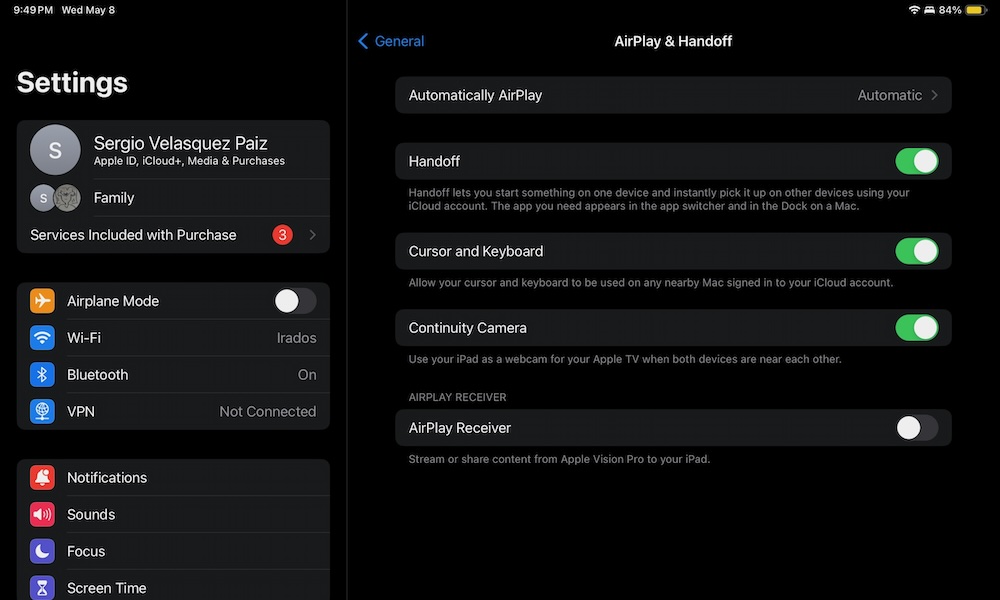
- Open the Settings app.
- On the left sidebar, tap on General.
- Go to Airplay & Handoff.
- Turn on Cursor and Keyboard.
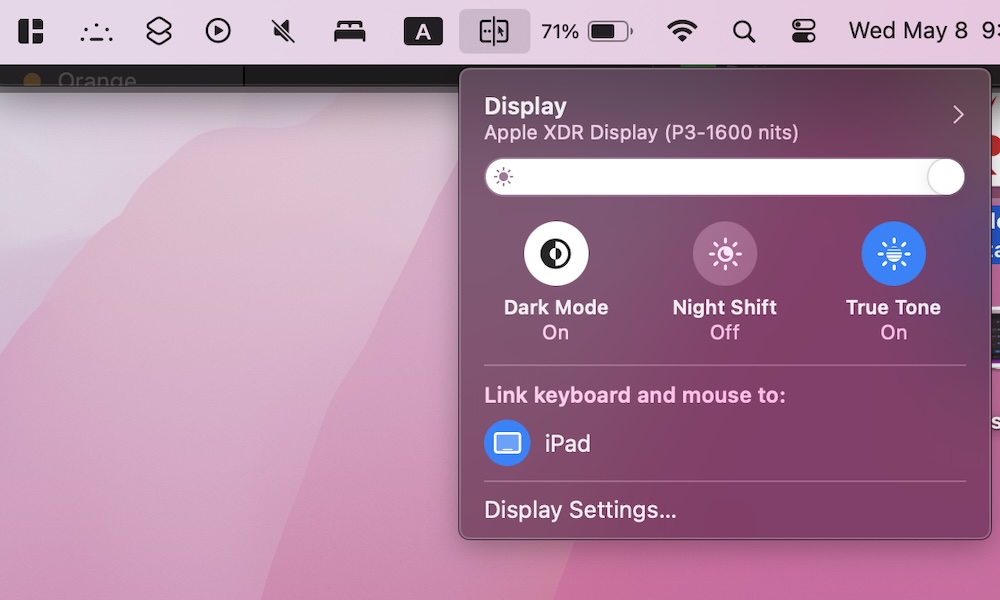
How to Connect Your Mac and iPad With Universal Control
Once both your devices have Universal Control activated, you can connect them to each other. Here’s how:
- Place both devices near each other.
- Ensure both your iPad and Mac are unlocked and awake.
- Use your mouse or trackpad to move your cursor to the left or right edge of your Mac’s screen. A vertical stripe will appear where you place your cursor.
- Continue moving your cursor past the edge of your screen, and you’ll see it move to your other device’s screen.
That’s it! Once you’ve moved your cursor all the way through, you’ll be able to use your mouse and keyboard on your other device effortlessly. You can seamlessly switch between devices without any hassle.
How to Stop Using Universal Control
Once you’ve finished using your Mac and iPad together, you may want to keep your mouse in one place. In that case, it’s best to disable Universal Control to prevent your cursor from attempting to move to the other device continuously.
There are several ways to disconnect your devices. You can put one of the devices to sleep or use the Universal Control button on your Mac to disconnect them. Alternatively, you can press Control+Option+Command+Delete on your keyboard to disconnect all connected devices quickly.
Master Universal Control on Your Mac and iPad
Utilizing Universal Control is a convenient way to connect your Apple devices seamlessly. Whether you’re linking your Mac and iPad or multiple Macs simultaneously, this feature enhances productivity by eliminating the need to waste time transferring files between devices.
While having multiple devices connected can be overwhelming, the ease of connecting and disconnecting them swiftly makes the process hassle-free.